Envision this: You’re all set for an epic podcast session or a gaming night, your trusty Yeti microphone by your side. You plug it in, fire up Blue Sherpa, but then… nothing. Your microphone, usually so reliable, is now a ghost to the software. Blue Sherpa not detecting Yeti Is not just a technical snag; it’s a brick wall blocking your creative flow.
To resolve the “Blue Sherpa not detecting Yeti” issue, start by checking your USB ports and cables for any faults. Next, ensure your Yeti microphone is set as the default recording device in your computer’s sound settings. If the problem persists, try reinstalling Blue Sherpa and updating your microphone’s drivers.
This problem isn’t just frustrating; it’s a momentum killer. Here you are, ready to unleash your creativity or dive into an immersive experience, and technology fails you. But don’t let despair set in. Every problem has a solution, and in the dynamic digital world, solutions are often simpler than they appear. The key is to dissect the Blue Sherpa not detecting Yeti issue methodically and apply a fix that brings your Yeti back to life, making it visible to Blue Sherpa once again.
See Also: Windows OS 0x80240023 Update Error | Top 8 Fixes
Table of Contents
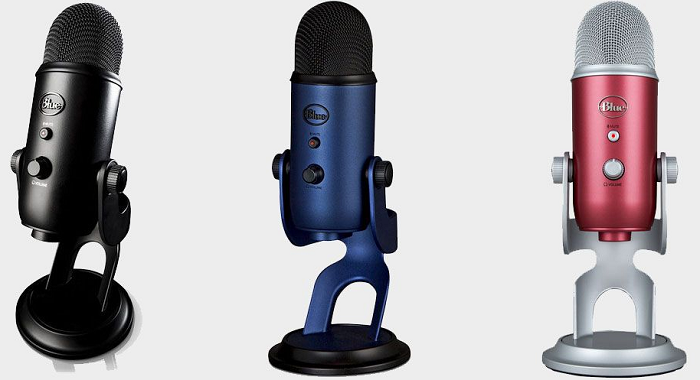
What Is Blue Yeti?
Blue Yeti is a prominent brand that manufactures sound input and output gadgets like headphones, speakers, and microphones. They are renowned for their easy-to-use attributes and straightforward interface.
Famous video game streamers like DrLupo and Myth use the microphone to stream. One of the users’ most frequent problems with this mic is that Windows does not recognize the Blue Yeti mic. Check out this article to know more about What Is Wwahost.exe.
See also: Does Your Steam Download Slow? Here’s The Fix!
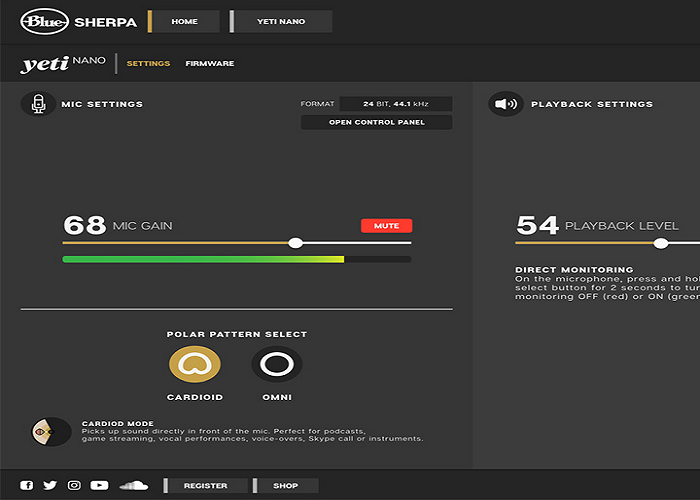
What Is Blue Sherpa?
The Blue Sherpa is used to download and establish the latest firmware updates directly to your Yeti microphone.

You can also modify the Mic Gain, plus the Direct Monitoring and Headphone Level of your Blue Yeti.
See Also: 4 Best Fixes for Windows 10 Not Detecting HDMI TV/Monitor
How To Get The Blue Sherpa Software?
The Blue Sherpa app is an available download from the Blue Designs website, open for Windows 7, 8.1, 10, and 11.
We can choose Windows or Mac versions of the app, so download the software version as required. When the download is complete, execute the Install Aware Wizard software by double-clicking on it.
Visit: Blue Sherpa
Causes For the Error
The Blue Sherpa Oh no! statement is the screen you will see if you have not got your Yeti plugged into your computer. It is saying that it seems you do not have any Blue devices connected.
If you plug the Yeti back in and still see the “Oh no!” message, there is a problem.

The factors that may cause this are:
- Connectivity Issues: The link of the microphone may be loose because of hardware issues. The USB port may not have identified the microphone. There are possibilities for the microphone to have hardware issues, which could contain the microphone from being detected by the computer.
- Misconfigured Microphone Settings: Even if the microphone is perfectly functional, certain software-related conditions must be met before using your Blue Yeti microphone.
Solutions For The Error When Blue Sherpa Not Detecting Yeti?
The following approaches are applicable when the issue of Blue Sherpa not detecting Yeti arises. These approaches if applied in the mentioned order will surely fix the error.
First Approach
The first way to fix the error of blue Sherpa is below in a step-by-step process.
- Confirm that the Blue Yeti is connected to a USB port on the computer. You shall see a red LED on the mute button.
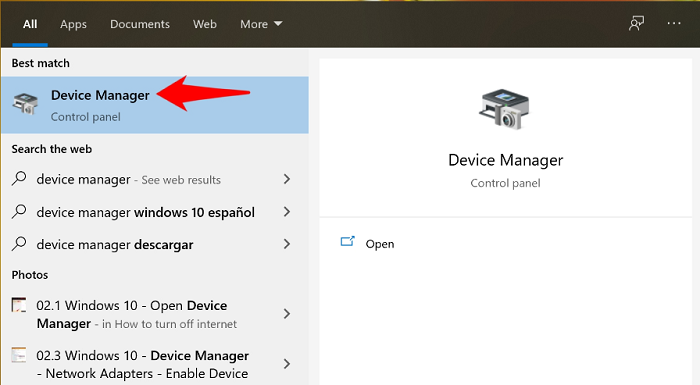
- Tag “Device Manager” into the search bar. Click on the entry to open the device manager. You shall see the Device Manager Control Panel as the most suitable match.
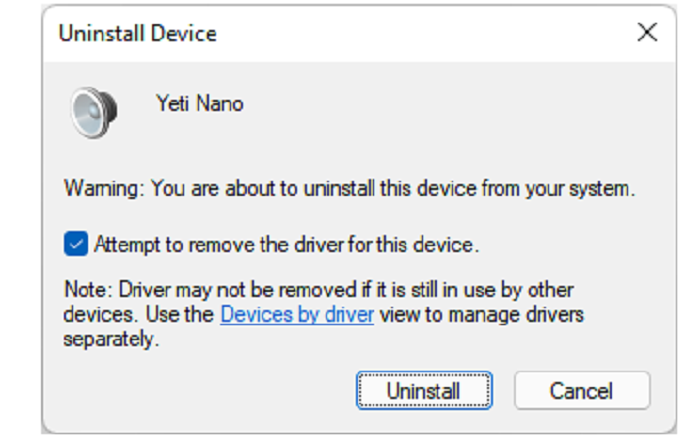
- Left-click per Blue Yeti device and choose “Uninstall.” with the Device Manager open, extend Audio inputs and outputs. You shall see Yeti Stereo Microphone documented as both a microphone and speaker.
- Unclog the Yeti’s USB cable from the computer.
- Power off the computer and wait a few moments before rebooting the PC.
- Connect the Blue Yeti microphone to the computer and wait a few moments for Windows to install the microphone.
- Open the Blue Sherpa app. You shall see the Sherpa Home screen with Yeti noticed and shown as the connected device.

See Also: Failed To Play Test Tone On Windows 10? Here’s The Fix!
Second Approach
If that is not the case, here is another approach:
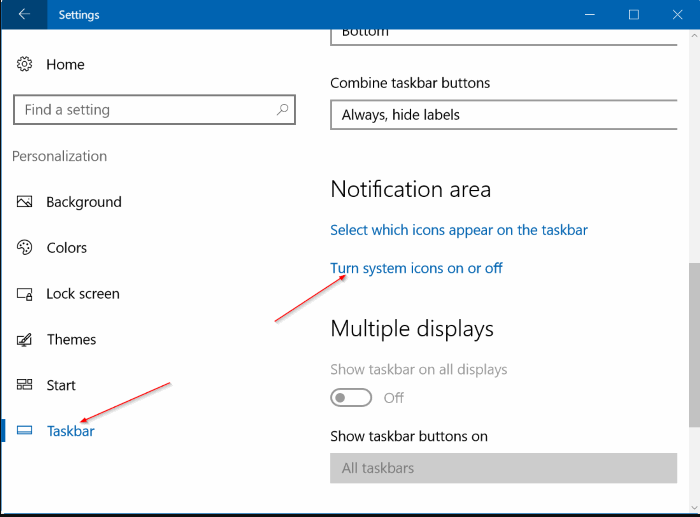
- Go to the Windows 10 taskbar.
- Navigate to the system tray.
- Right-click on the Speaker icon.
- Select Recording Devices.
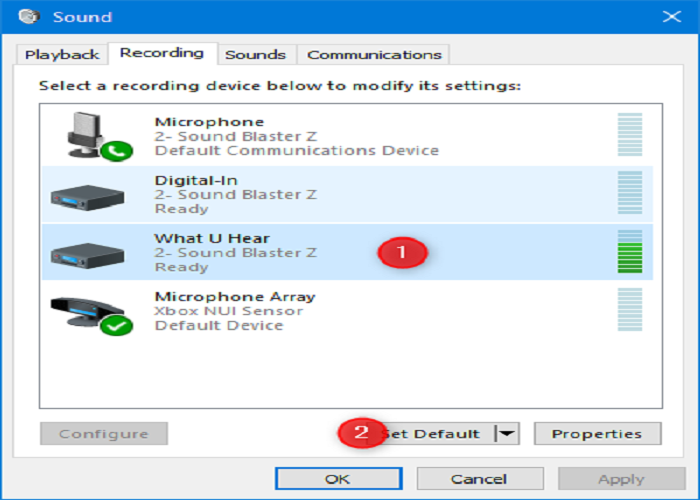
- Find the Blue Yeti mic (remember that it may be known as a “USB Advanced Audio Device”).
- Right-click on the device, and then you will have to select “Set Default Device.”
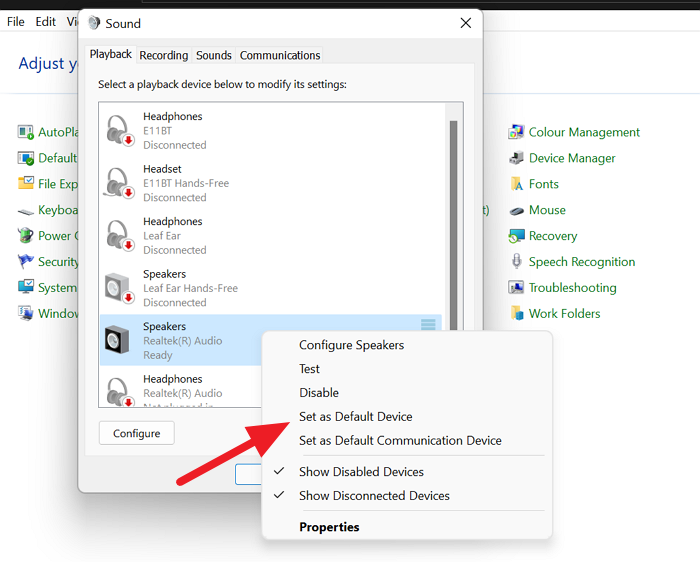
- Click Apply and OK to preserve the changes.
Third Approach
If the problem does not resolve, we have another solution for you:
- Move to the volume icon in the Windows taskbar.
- Right-click on the icon.
- Press the Recording devices.
- Discover space and right-click on it.
- Choose ‘Show disconnected devices’ and ‘Show disabled devices.
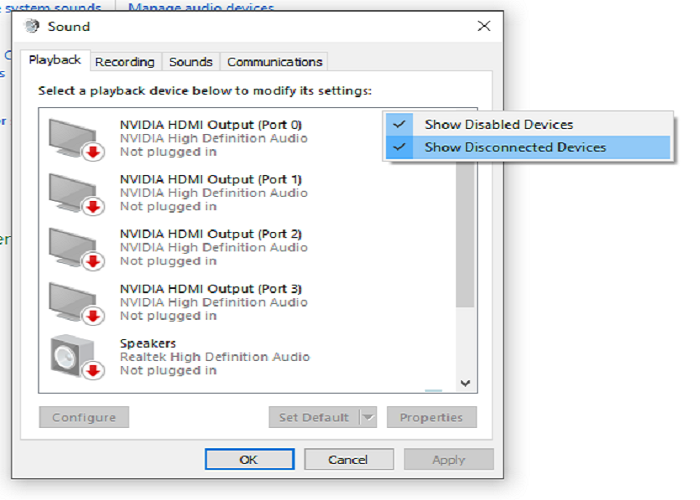
See if the microphone will get detecting now. Then enable it. This must solve the sherpa not detecting yeti error.
Common Mistakes To See When Blue Sherpa Not Detecting Yeti
There are some common mistakes while connecting the Yeti mic to Sherpa:
- See If the Volume Is low.
- Check If The Microphone Is On.
- Check the acknowledgment of the Blue Yeti Microphone.
- Review The Microphone Connection.
- Try Connecting The Blue Yeti Mic Into A Separate Port.
- Troubleshoot The System Audio.
- Set The Blue Yeti Microphone As the Default Audio Input. Read this article, if you want to fix “no audio output device is installed”.
- Download Updates For your Blue Yeti Drivers.
See also: 4 Reasons: What Does The Blue Dot On Apple TV Mean?
FAQs
How do I get Blue Sherpa to recognize my Yeti microphone?
If Blue Sherpa isn't detecting your Yeti, first ensure the microphone is properly connected and recognized by Windows. In the Windows Sound settings, make sure the Yeti is selected as the default microphone. You can also check the Device Manager to ensure the Yeti's correctly installation under Audio inputs and outputs.
What should I do if my computer doesn't recognize the Blue Yeti mic?
Start by checking different USB ports and cables. If the microphone works on another computer, the issue might be with your computer's drivers. Updating or reinstalling the drivers for your sound card and USB ports can often resolve this issue .
Can I use the Blue Yeti as a soundcard?
Yes, the Blue Yeti also functions as a soundcard. This means you can listen to audio from your computer through the headphone socket on the Yeti. Adjusting the headphone levels in the Windows Sound Panel or Blue Sherpa will affect the sound in your headphones .
What are some common issues when setting up the Blue Yeti?
Common issues include the microphone not being set as the default device in sound settings, physical obstructions near the microphone, and outdated or corrupted audio drivers. Ensuring a clean connection and updating drivers are essential steps for smooth operation .
Why is my Yeti microphone not working even after being recognized by Windows?
This could be due to audio enhancement software interfering with the Blue Yeti’s performance. Disabling any audio enhancements in your sound settings and then restarting your computer might resolve the issue. It's also important to check for any physical damage or obstructions near the microphone .
Conclusion
If the microphone is not recognizing the “Blue Yeti microphone on Windows” this means there is still an issue. Your last resort is Blue customer support. Hence, they must be capable of giving you a solution.
You can also consult with an assistance unit concerning the microphone. We hope this article helped you fix Blue Yeti on your Windows PC. For more updates, subscribe to Ishan’s newsletter.
See also: Fixing Microphone Access Denied In Browsers: A Guide

Joe Fedewa, a Staff Writer at Automaticable, with nearly a decade of tech journalism experience. Former News Editor at XDA Developers, passionate about technology and DIY projects. Wrote thousands of articles, tutorials, and reviews, starting with Windows Phone coverage.