If you are unable to retrieve your crucial files or if you are encountering trouble while accessing your storage device on your PC, then it might be due to the Data Error Cyclic Redundancy Check error. This set of circumstances can occur in the form of the inaccessible drive, data error, or incapable of loading drive. This post will entirely troubleshoot your Cyclic Redundancy Check error. I am going to tell you different ways to fix data error Cyclic Redundancy Check error.
Cyclic Redundancy Check (CRC) is fundamentally a data assessment mechanism, which leads to the utilization by a computer to scrutinize the precision of data present on the disk incorporating both optical disk and hard disk drive. Cyclic Redundancy Check notices all kinds of casual or fortuitous modifications in primary data. This tool is frequently used in digital networks and storage devices.
But CRC error can strike your computer unexpectedly. This error could be potentially due to the account of registry fudging, incomplete installation of a program, corrupt files, distorted hard drive, or presence of defective media. CRC error can damage the files, collapse the system or cause injury to the memory. To abstain from data and system destruction, try to fix it in the short run. The question arises, how do I fix the cyclic redundancy check error on my external hard drive?
Go and give a trial by following various suggested methods.
See also: Ethernet Doesn’t Have A Valid IP Configuration In Windows 10 [Full Fix]
Table of Contents
Different Ways To Fix Data Error Cyclic Redundancy Error
There are several different ways to fix Data Error Cyclic Redundancy Check error. Hit and trial the definite course of action to eradicate the bothersome error. The error is temporary so, no need to worry. Just go and check out the below-mentioned working methods.
See Also: An Unexpected Error Is Keeping You From Copying The File | Top And Easy Fixes
By Scanning Through System File Checker
System File Checker is the inbuilt feature primarily bring into play for reconditioning the corrupt files, registry files, Windows DLL files, or other impaired folders. System File Checker aids in searching the problems and restore them with a fresh one. To begin the System File Checker scan, go along with the following steps to fix cyclic redundancy check:
- First and foremost, hit the “Start” menu button and type “cmd.”
- Then do the right click on “Command Prompt” and go for the “Run as Administrator.”
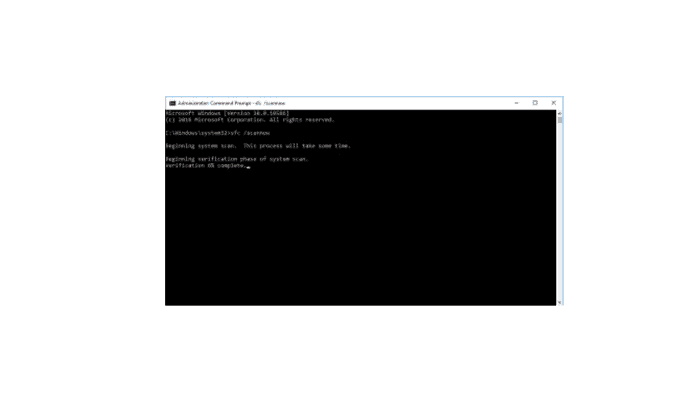
- If you are a Windows 10 user, then undoubtedly write the given command-
- “DISM.exe/online/cleanup/image/restore health”. This step is necessary to safeguard your data.
- Once the DISM command gets finished, type “sfc/scannow,” and then tap the “Enter” button.
- At last, reboot your computer and set out to re-establish the drive so that it uses the store data.
See also: How To Fix ‘We Couldn’t Update System Reserved Partition’ Error
Through CHKDSK Utility
To eradicate the cyclic redundancy error, one should restore the hard drive by performing the CHKDSK function through a command prompt. CHKDSK examines the strength of the hard drive and eliminates the set of errors in the system. You can regulate the CHKDSK system tool by applying successive steps.
- Firstly, link the storage device to your computer.
- After that, press Windows+Q together and type “cmd” in the rectangular box.
- Do the right-click in the “Command Prompt” and choose “Run as Administrator.”
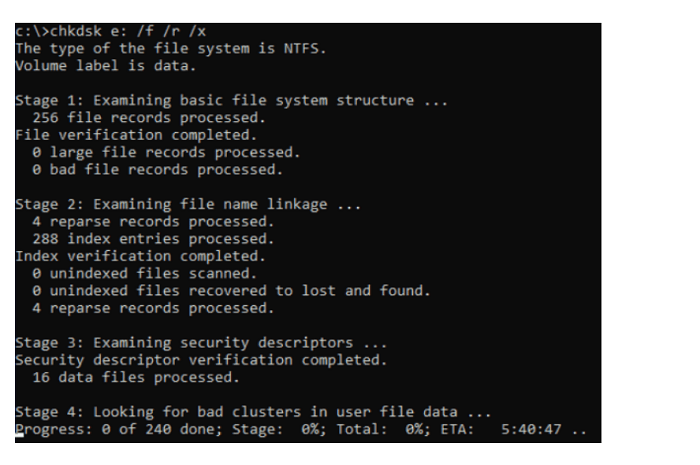
- A dialogue box of “Command Prompt” will pop up. Type-in chkdsk C:/f in the Command Prompt and then tap Enter.
- If you have any other drive to scan, subsequently replace the letter “C” with your respective disk drive name.
Instead of this command, you can also try chkdsk C:/f/r/x to reach and solve the existing hitch all together.
- Sit tight until the scanning process gets over. Consequently, the system will automatically fix and repair the device.
See also: Kernel Data Inpage Error : How to Fix It Once And For All
Through Disk Check
Another method of fixing the data error cyclic redundancy check external hard drive is Disk Check. It is an efficient way to inspect and resolve the error lodge in the system. It will securely remove the fault and make the device accessible. Carry out the forthcoming steps to fulfill the Disk Check task.
- First of all, launch the Windows File Explorer.
- Do the right-click on the unattainable hard drive and select “Properties.”
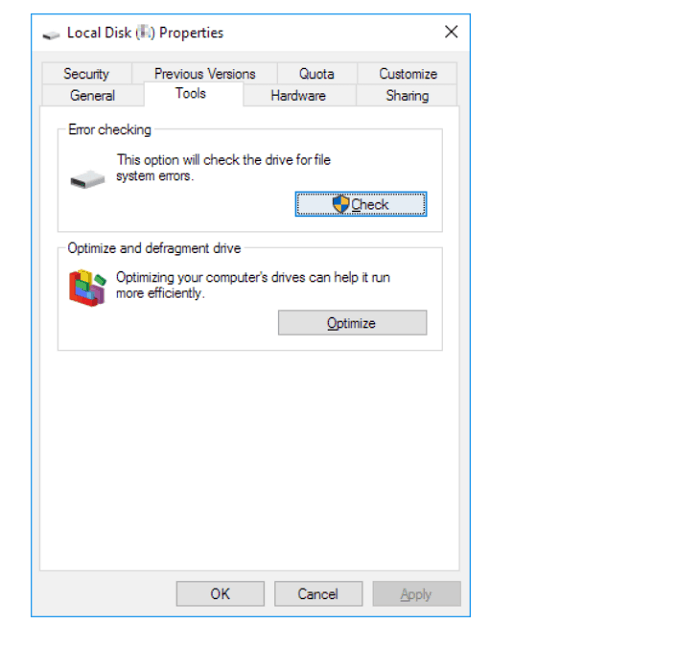
- Beneath the “Tools” option, select the “Check” button inside the Error Checking zone.
- Select “Scan Drive” if the error will appear on the screen.
- Once the scanning process gets over, reboot your computer and verify whether you can access your device or not.
By Formatting The System
If the data error (cyclic redundancy check) is still a stumbling block in your device, then attempt to format the entire system to fix the error. After formatting and resetting, your device might get rid of the CFC issues. Execute the recommended move to format the computing system.
- In the first place, press the Windows key+E to open the Windows File Explorer.
- Afterward, do the right-click on the troublesome hard drive and choose “Format.”
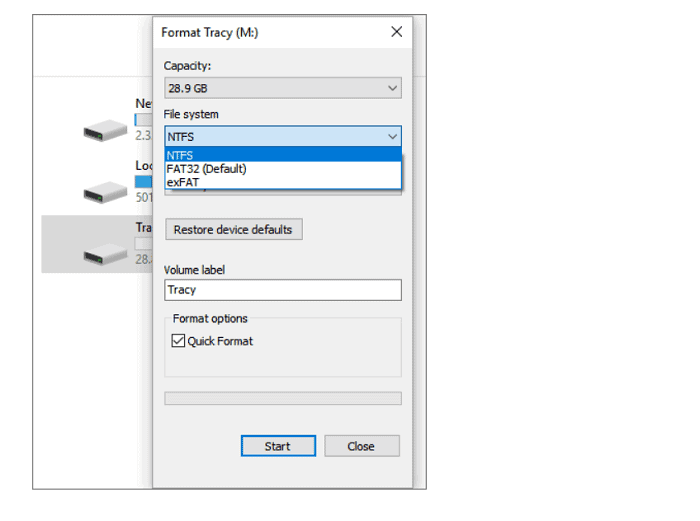
- Under the “File System,” choose “NTFS” in the Format dialogue box.
- Verify “Quick format” and select “Start.”
See also: Fix Windows 10 File Explorer Won’t Open Issue | 5 Working Methods
Final Take
All these aforenamed ways to fix Data Error Cyclic Redundancy Check error is a feasible approach to eliminate it. A user has to apply divergent methods to know what will work for them.
I hope you found this article well-informed, beneficial, and fruitful. If you are overfamiliar with other workable methods to fix the Data Error Cyclic Redundancy Check error, let me know in the comments below. I will be glad to hear out from you.
See also: Steam Disk Write Error : What It Is and How to Fix It

Tony, computing writer at Automaticable, covers laptops, tablets, Windows, iOS. Off-duty, he indulges in comics, gaming, speculative fiction, and excessive Twitter use. Non-nerdy side includes rocking out at concerts and hitting NYC bars.