Many Windows 10 users have complained that the audio renderer error that surfaces on their computer. The error is said to occur mostly while playing YouTube videos. Which is why it is also known as YouTube audio renderer error. What makes the nature of this error more peculiar is that it is not limited to a particular browser or Windows version. There have been reports of occurring on prominent browsers like Mozilla and Chrome as well as on multiple versions of Windows. If you do get a YouTube audio renderer error please restart your computer.
The reason behind the error may not be certain. Some say it stems from a faulty audio driver to others claiming it happens due to a BIOS bug (Dell users mostly) or even a faulty Windows 10 update (Ah! The dreaded Windows 10 updates !) there are ways to deal with the issue certainly.
In this article, we list out four comprehensive methods to fix the audio renderer error on Windows 10.
See Also: Computer Restarts Randomly on Windows 10 [SOLVED]
Table of Contents
Fix Audio Renderer Error
We will start with some simple short-term fixes for the error that one can follow for a quick and immediate fix. We will then move on to somewhat sophisticated but more permanent fixes that might solve the issue permanently. You can attempt them all one by one to fix the error on your computer.
See Also: AirPods don’t connect to Mac – Here’s How to Fix It
Method 1: Reconnecting Your Audio Device
Let’s start with a very simple method. You might be using a wired/Bluetooth headset or speakers with your computer. What you need to do is just to disconnect whichever device you were using for audio at the time when you encountered the error. Once disconnected, try to connect the audio device and run your computer again. This might solve the problem, but it is only a temporary short-term fix.
See Also: How to Fix the “No Audio Output Device Is Installed” Error on Windows 10
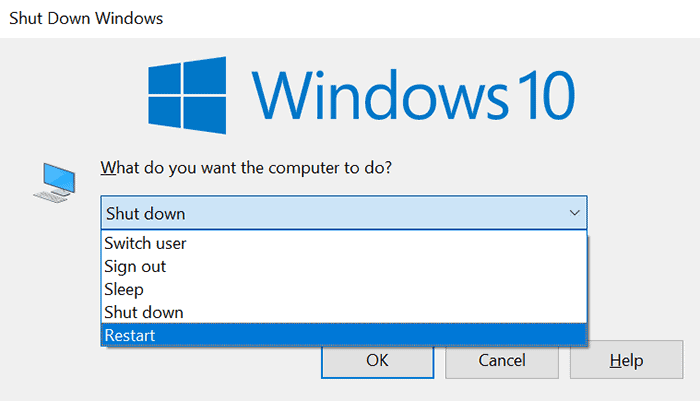
Method 2: Restarting Your Computer
If you encounter an audio renderer error please restart your computer. Many users have pointed out, restarting your computer upon encountering the error is a possible fix for the error. However, again this is also just a temporary fix, and the error might resurface after a while.
While the above two methods are quite simple, they only offer a short-term fix for the audio renderer error in Windows 10. Hence, you should follow either one of the next two methods listed below for a more permanent fix.
See Also: Nvlddmkm.sys Error On Windows 10 | Top 4 Fixes
Method 3: Disabling and Re-Enabling Audio Device via Device Manager
Follow these steps to fix the audio renderer error in Windows 10 via Device Manager.
Step 1: Click on the Start button and open Device Manager. Or, you can also search for Device Manager via the Search pane in the Taskbar.
Step 2: Navigate to Audio Inputs and click on the arrow pointing towards the right to expand it.
Step 3: Right-click on your default audio device and choose Disable device from the menu.
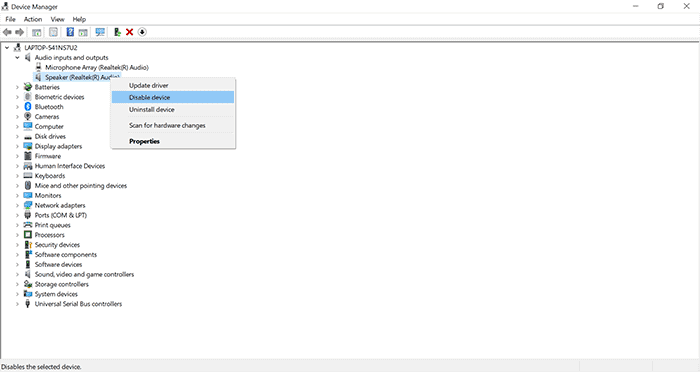
Tip: In case you are confused as to what is your default audio device, just click on the Volume button in the taskbar. The default audio device will be mentioned here. However, make sure that you are not connected to any other audio devices like Bluetooth/wired headsets or speakers before looking for your default audio device.
Step 4: Click on Yes in the dialogue box that appears after completing Step 3.
Step 5: Once finished with Step 4, just right-click on the default audio device again and choose Enable device this time.
Try to run the audio device now. The error should not resurface if you have followed all the steps listed above.
See Also: Music/Video error 0xc00d36c4 on Windows 10 [Solved]
Method 4: Run The Audio Troubleshooter
You can use the built-in troubleshooter for audio to fix the audio renderer error in Windows 10.
Just follow these simple steps listed below.
- Click on the Start menu.
- Type Troubleshoot settings and click on it to open the troubleshoot window in the settings app.
- Navigate to Additional Troubleshooters.
- Click on Playing Audio, and select Run the troubleshooter.
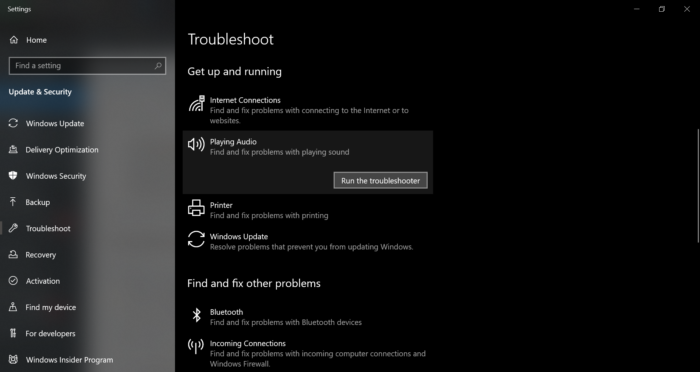
- Follow the instructions given by the troubleshooter to fix the error.
The error should not occur again once you finish the steps the troubleshooter directed you to perform.
Conclusion
Hopefully, the methods mentioned will help you to resolve the error permanently. However, if the issue still persists, you should try out a few System Repair Tools like System Mechanic Ultimate Defense or Fix-Win for Windows 10. These System Repair Tools scan for corrupt or missing files and replace them.
Thus, in case the error occurs due to any corrupt files that may have originated due to a faulty update or may have gotten deleted by accident, these tools will certainly help you to fix the issue. After trying any of the methods for fixing audio renderer error. Please restart your computer. This might help apply the changes.
If none of those, as mentioned earlier, tips work out for you, you can also take the help of an authorized repair service depending on the brand of your computer.
See Also: Data Error Cyclic Redundancy Check | 4 Easy Ways

Tony, computing writer at Automaticable, covers laptops, tablets, Windows, iOS. Off-duty, he indulges in comics, gaming, speculative fiction, and excessive Twitter use. Non-nerdy side includes rocking out at concerts and hitting NYC bars.